CARPORT UNIVERSITY

How are carports built? We teach you how to design your own custom carport

Lesson 1: Setting the Foundation

blueprint, ruler, architecture-964629.jpg

How are carports built, you might ask. Take a look at a few different layouts. Don’t see one that fits your needs? No worries keep reading.

Please take note of your needed dimensions. It is strongly recommended to measure and make sure you choose dimensions that will fit your needs. Keep in mind vehicle doors need to be opened so you can get out. It’s better to have too much than not enough.

MINI/MAX WIDTH 12ft/80ft 

MINI/MAX LENGTH 20ft/100ft 

MINI/MAX HEIGHT 6ft/20ft

In other words our starting size frame is 12′ W x 20′ L x  6′ H (base) We can go smaller but the cost would be same as (base) 

Please follow along and watch for the STOP sign and follow the directions.

stop, road sign, roadsign-98913.jpg

In this section, you should do your best to decide what WIDTH and LENGTH you would need in order to accomplish your goal.  For Example:

12’W x 20’L or 20’W x 25’L

Next: We hope to help you plan this project the best by showing the sizes of a few vehicles.

Lesson 2: Getting Better Perspective

blueprint, ruler, architecture-964629.jpg

We hope to help you plan your purchase the best possible way

Answer these questions and write down your answers:

What do you plan to park under this?

Do you have friends and family that come over with big vehicles?

Do you have anything else you might want to cover?

Are you currently paying for storage?

What other questions could we add here?

stop, road sign, roadsign-98913.jpg
  • In this section, you should measure the HEIGHT of what you are planning to park under the carport.
  • If you are needing roll up doors for a garage, the minimum amount of clearance you will need to successfully pull into the door is something, you should take note of as well.

Our starting size building is 12′ W x 20′ L x  6′ H (base carport size) We can go smaller but would cost would be same as (base carport size)

bird, mountains, view-3410693.jpg

Our Journey So Far

At this point you should hopefully have solid understanding of what size will be needed to accomplish this project.

The next step is an important step in the carport design process. A lot of clients tend to overspend or not get enough to serve their needs properly.

Lesson 3: Choosing Your Carport Roof Style

Our entry level style frame. Its an economical style roof that will give great protection. If you are looking to go further with less, this may be the route for you.​
Horizontal Frames are a leap in the direction of great looks while not breaking the bank. These frames have been engineered to hold up against the elements more effectively within areas with higher accumulation rates.
A-Frame Vertical Frames are just as classy as our horizontal frames but built to last a lifetime with additional strength into the roof to hold up against areas with more frequent weather events. The water also drains on the sides instead of the ends. Can handle higher snow loads as well.
blueprint, ruler, architecture-964629.jpg

Our starting size building is 12′ W x 20′ L x  6′ H (base) We can go smaller but would cost would be same as (base)

Keep this in mind when we talk about our roof types and additional clearance they provide. You read that right.

Our roofs add extra clearance in addition to the leg height.

Specifically:

Standard style roof = 2ft additional clearance, when standing in the middle of the carport. (6ft base leg + 2ft standard style roof = 8ft of clearance when standing in the middle of the carport (PEAK TO SURFACE)

A-Frame Horizontal style roof = 1ft additional clearance, when standing in the middle of the carport. (6ft base leg + 1ft A-Frame style roof = 7ft of clearance when standing in the middle of the carport (PEAK TO SURFACE)

A-Frame Vertical style roof = 1ft additional clearance, when standing in the middle of the carport. 6ft base leg + 1ft      A-Frame style roof = 7ft of clearance when standing in the middle of the carport (PEAK TO SURFACE)

Lesson 4: Selecting your Carport Height and Understanding Clearance.

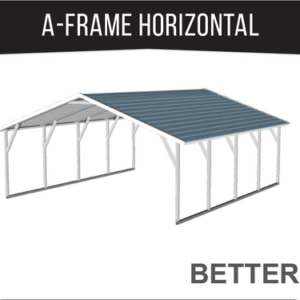
A - Frame Roof Style

This illustration shows our 12' W x 40' L x 6'H. As seen here, this style roof gives an almost 1 foot of clearance at the peak. A 6ft man would hit his head on the roof if walking in next to sidewall.. As you can see, the A-Frame style roof has 1ft less of clearance however it makes up for this loss in even more strength.
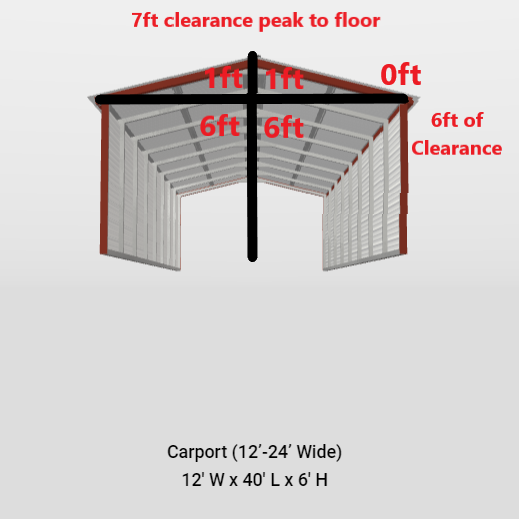
Standard Roof Style

This illustration shows our 12' W x 40' L x 6'H. As seen here, this style roof almost gives an additional 2ft of clearance at the peak. 1ft standing next to sidewall. A 7ft man would hit his head on the roof if walking in next to sidewall.

stop, road sign, roadsign-98913.jpg

In this section you should do your best to select the appropriate leg height needed to add to roof to get necessary clearance for your needs.

Please ensure you account for addition height needs. for example: Antennas, AC Unit or other top carriage you may need additional clearance for!

By now you should notice that, no matter the building type you want (carport, workshop, barn etc.) as well as how carports are built You will simply select the roof type you want and add enclosed walls, doors or windows to build the building that will fit your needs. Keep in mind the costs do go up as we make the building larger, making it taller or enclosing. Check out our 3-D Builder on our home page to see your skills in action in your own 3-D world. Make your building come alive with your smart phone and view your creation on your land AUGMENTED REALITY.

Custom Design

Call 1-800-520-3660

Our advisors excel at uncovering client needs and tailoring solutions. Let our experienced team guide your purchase with education and service. If you prefer self service, design your building with our 3D Builder.

Shopping Cart